نقل البيانات من View إلى Controller
-
في هذه العملية يتم نقل البيانات من شاشة المستخدم النهائي الى Controller الي بيقوم بمعالجة هذه اللبيانات حسب الطلب.وهنا بنقوم بعمل View لتسجيل الطلاب بحتوي مجموعة من البيانات وبنشوف كيف بنرسل هذه البيانات الى controller، وطبعا لحد الان ما بنشتغل على قواعد البيانات الفكره فقط نفهم كيف بتنتقل البيانات .
تمام
يتم نقل البيانات من View إلى Controller في عدة اشكال وهي:
- Query string
- form values
- parameters parsed from the URL
وهذه الطرق تُعرف مجتمعة بمصطلح يسمى context data.
طيب تمام،
وحتي نحصل على context data هذه عندنا 3 طرق وهي:
- Controller’s request property
- a parameter to an action method
- Model Binding
وحتي نفهم هذه الطرق بشكل افضل خلونا نبدأ بامثلة عملية على ذلك:
اولا :Controllers Request Property – Request.Form
يحتوي Controller class على خاصية Request التي تعمل على إرجاع HttpRequest object الذي يصف الطلب المستلم request received من العميل.
يحتوي HttpRequest على خاصية Form property التي تقوم بإرجاع dictionary of form data. يمكنك استخدام خاصية " Form" لنقل البيانات من View.
حتي نفهم الموضوع بشكل اكثر نعمل مثال:
ننتقل الى View المسمى NewStudent وبعدها نعمل form داخل هذا View. طيب الان خلونا نغيير الكود في هذا View كما هو موضح أدناه:
@{
    Layout = null;
}
<!DOCTYPE html>
<html>
<head>
    <meta name="viewport" content="width=device-width" />
    <title>Index</title>
    <link href="~/lib/bootstrap/dist/css/bootstrap.css" rel="stylesheet" />
</head>
<body>
    <div class="container">
        <form method="post" asp-action="ReceivedDataByRequest">
            <div class="form-group">
                <label>CustomerNo:</label>
                <input class="form-control" name="TxtCustomerNo" />
            </div>
            <div class="form-group">
                <label>FullName:</label>
                <input class="form-control" name="TxtFullName" />
            </div>
            <div class="form-group">
                <label>Birthday:</label>
                <input class="form-control" name="TxtBirthday" />
            </div>
            <div class="form-group">
                <label>Gender:</label>
                <select class="form-control" name="DRDSex">
                    <option value="M">Male</option>
                    <option value="F">Female</option>
                </select>
            </div>
            <div class="form-group">
                <label>Nationality:</label>
                <select class="form-control" name="DRDNationality">
                    <option value="M">Jordan</option>
                    <option value="F">Saudi Aribae</option>
                    <option value="F">UAE</option>
                </select>
            </div>
            <div class="form-group">
                <label>Address:</label>
                <input class="form-control" name="TxtAddress" />
            </div>
            <div class="form-group">
                <label>UserName:</label>
                <input class="form-control" name="TxtUserName" />
            </div>
            <div class="form-group">
                <label>Password:</label>
                <input class="form-control" name="TxtPassword" />
            </div>
            <div class="form-group">
                <label>Email:</label>
                <input class="form-control" name="TxtEmail" />
            </div>
            <div class="form-group">
                <label>Mobile:</label>
                <input class="form-control" name="TxtMobile" />
            </div>
            <div class="form-group">
                <label>Note:</label>
                <input class="form-control" name="TxtNote" />
            </div>

            <button class="btn btn-primary" type="submit">Submit</button>
        </form>
    </div>
</body>
</html><link href="~/lib/bootstrap/dist/css/bootstrap.css" rel="stylesheet" />
- Container
- form-group
- form-control
- btn btn-primary
https://localhost:44382/Students/NewStudent

asp-action="ReceivedDataByRequest"
using StudentsAcademy
@using StudentsAcademy.Models
@addTagHelper *, Microsoft.AspNetCore.Mvc.TagHelpers
using Microsoft.AspNetCore.Mvc;
using StudentsAcademy.Models;
using System;
using System.Collections.Generic;
using System.Linq;
using System.Threading.Tasks;
namespace StudentsAcademy.Controllers
{
    public class StudentsController : Controller
    {
        public IActionResult Index()
        {
            return View();
        }
        public IActionResult NewStudent()
        {
            return View();
        }
        public IActionResult ReceivedDataByRequest()
        {
            string CustomerNo = Request.Form["CustomerNo"];
            string FullName = Request.Form["FullName"];
            string Birthday = Request.Form["Birthday"];
            return View("ReceivedDataByRequest", $"Customer Number :{CustomerNo} ,FullName is {FullName} ,Birthday is {Birthday}");
        }
    }
}
تمام نفهم الكود (تذكير لحد الان ما تعاملنا مع قواعد البيانات)
في هذا action عملنا استقبال البيانات باستخدام الامر Request.Form التي تعمل على ارجاع البيانات على شكل dictionary of form’s data
الاسم الموجود في Request.Form يجب ان يكون هو name ل control في View
في action عملنا استقبال للبيانات التالي
| القيمة الراجعه | Code |
| CustomerNo | Request.Form["CustomerNo"]; |
| FullName | Request.Form["FullName"]; |
| Birthday | Request.Form["Birthday"]; |
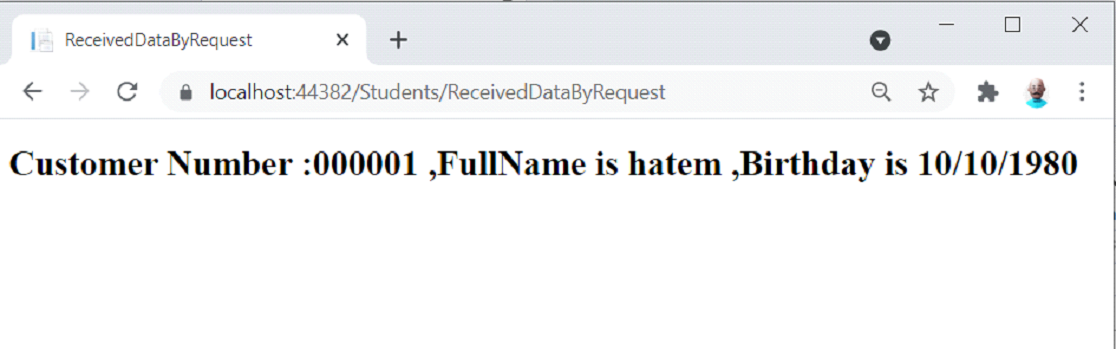
يتم بعد ذلك توجيه action الى View باسم ReceivedDataByRequest (تم اعادة التوجيه الى View آخر غير الي عملنا فيو ادخال للبيانات) حيث يتم عرض البيانات التي تم ارجاعها.
الكود المسؤول عن توجيه action الى view :
return View("ReceivedDataByRequest", $"Customer Number :{CustomerNo} ,FullName is {FullName} ,Birthday is {Birthday}"); سيتم عرض البيانات في view على شكل string تحتوي رقم واسم وتاريخ ميلاد الطالب
إذا حاولت تشغيل التطبيق الان فستكون النتيجة خطأ (لم نقم بإنشاء View باسم ReceivedDataByRequest حتى الآن)
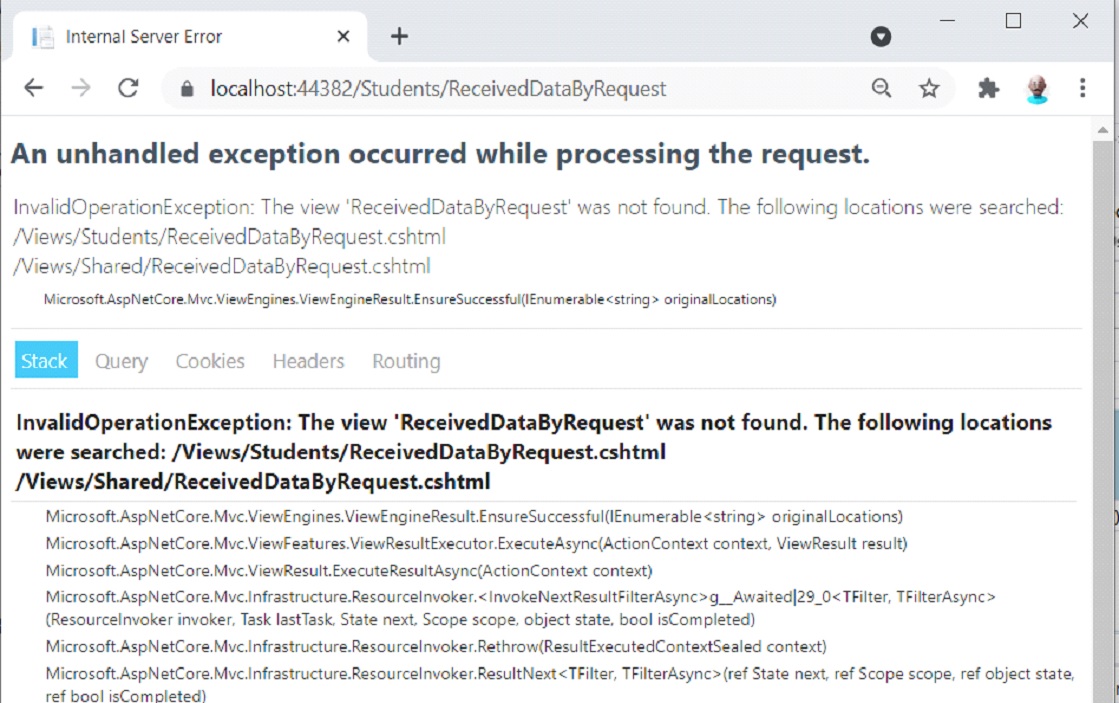
طيب وحتي نحل هاذه المشكلة اكيد بنحتاج الى إنشاء view لعرض البيانات:
انتقل الى StudentsController ثم انقر يمين في ReceivedDataByRequest action واختر Add View
ثم أضف الكود التالي داخل view
@model string
@{
    ViewData["Title"] = "ReceivedDataByRequest";
    Layout = null;
}
<!DOCTYPE html>
<html>
<head>
    <meta name="viewport" content="width=device-width" />
    <title>ReceivedDataByRequest</title>
</head>
<body>
    <h1>@Model</h1>
</body>
</html>
@model string
وهيك بنكون عرفنا كيف ممكن ننقل اللبيانات من View الى Controller باستخدام Request.Form مبروك.
الطريقة الثانية :
تلقي Context Data على شكل parameter يتم ارسالها عبر action method
الطريقة الثانية للحصول على Context Data المرسلة من View إلى Controller وهي action method’s parameters.
مثل ما تعلمنا يحتوي النموذج على مجموعة من controls التي تسمح للمستخدمين بإدخال البيانات الخاصة بهم مثل الاسم، تاريخ الميلاد، الجنسية ... الخ، ومن ثم ارساله الى controller. طيب حتى نستخدم parameters لإرسال البيانات يجب تعريف parameters في action method بحيث تتوافق أسماؤها مع controls الموججوده في النموذج. وبتوحيد أسماء ال controls وأسماء parameters يعرف MVC أنه يجب عليه نقل controls value هذه إلى parameters.
طيب وحتى نفهم الموضوع نعمل مثال على ذلك، تمام نبدأ بإضافة action method جديدة باسم ReceivedDataByParameter إلى StudentsController. ثم إضافة الكود التالي:
using Microsoft.AspNetCore.Mvc;
using StudentsAcademy.Models;
using System;
using System.Collections.Generic;
using System.Linq;
using System.Threading.Tasks;
namespace StudentsAcademy.Controllers
{
public class StudentsController : Controller
{
public IActionResult Index()
{
return View();
}
public IActionResult NewStudent()
{
return View();
}
public IActionResult ReceivedDataByRequest()
{
string CustomerNo = Request.Form["CustomerNo"];
string FullName = Request.Form["FullName"];
string Birthday = Request.Form["Birthday"];
return View("ReceivedDataByRequest", $"Customer Number :{CustomerNo} ,FullName is {FullName} ,Birthday is {Birthday}");
}
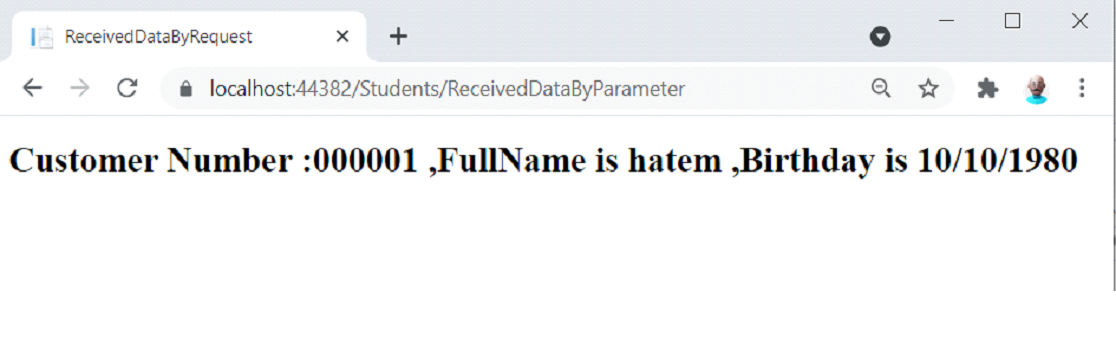
public IActionResult ReceivedDataByParameter(string CustomerNo,string FullName, string Birthday)
{
return View("ReceivedDataByParameter", $"Customer Number :{CustomerNo} ,FullName is {FullName} ,Birthday is {Birthday}");
}
}
}
sp-action="ReceivedDataByRequest" tag helper to
asp-action="ReceivedDataByParameter".
@{
    Layout = null;
}
<!DOCTYPE html>
<html>
<head>
    <meta name="viewport" content="width=device-width" />
    <title>Index</title>
    <link href="~/lib/bootstrap/dist/css/bootstrap.css" rel="stylesheet" />
</head>
<body>
    <div class="container">
        <form method="post" asp-action="ReceivedDataByParameter">
            <div class="form-group">
                <label>CustomerNo:</label>
                <input class="form-control" name="CustomerNo" />
            </div>
            <div class="form-group">
                <label>FullName:</label>
                <input class="form-control" name="FullName" />
            </div>
            <div class="form-group">
                <label>Birthday:</label>
                <input class="form-control" name="Birthday" />
            </div>
            <div class="form-group">
                <label>Gender:</label>
                <select class="form-control" name="Sex">
                    <option value="M">Male</option>
                    <option value="F">Female</option>
                </select>
            </div>
            <div class="form-group">
                <label>Nationality:</label>
                <select class="form-control" name="Nationality">
                    <option value="M">Jordan</option>
                    <option value="F">Saudi Aribae</option>
                    <option value="F">UAE</option>
                </select>
            </div>
            <div class="form-group">
                <label>Address:</label>
                <input class="form-control" name="Address" />
            </div>
            <div class="form-group">
                <label>UserName:</label>
                <input class="form-control" name="UserName" />
            </div>
            <div class="form-group">
                <label>Password:</label>
                <input class="form-control" name="Password" />
            </div>
            <div class="form-group">
                <label>Email:</label>
                <input class="form-control" name="Email" />
            </div>
            <div class="form-group">
                <label>Mobile:</label>
                <input class="form-control" name="Mobile" />
            </div>
            <div class="form-group">
                <label>Note:</label>
                <input class="form-control" name="Note" />
            </div>

            <button class="btn btn-primary" type="submit">Submit</button>
        </form>
    </div>
</body>
</html>
الان أضف View جديدة داخل مجلد Views ➤ Students وقم بتسميتها ReceivedDataByParameter. يستقبل هذا View أيضًا Model Value من نوع string ويعرض قيمة النموذج في علامة h1.الكود الخاص بهذه View :
@model string
@{
    Layout = null;
    ViewData["Title"] = "ReceivedDataByParameter";
}
<!DOCTYPE html>
<html>
<head>
    <meta name="viewport" content="width=device-width" />
    <title>ReceivedDataByParameter</title>
</head>
<body>
    <h1>@Model</h1>
</body>
</html>
https://localhost:44382/Students/NewStudent
وبهيك بنكون تعلمنا الطريقة الثانية للاضافة .
الطريقة الثالثة :
Model Binding
في Model Binding، يتم إنشاء Model، وهو عبارة عن class يتم الاحتفاظ بها داخل مجلد Models. بعد ذلك نقوم بربط model class هذا مع form.
أخيرًا لاستقبال القيم في Controller، يجب اضافة parameter من نوع model class هذه في Action method’s.
تمام التمام حتي نفهم الموضوع اكثر نطبق مثال :
ننتقل الى مجلد Models ونعمل class باسم StudentsModel وبعدها نضيف الكود التالي :
الكود الخاص بهذا الملف :
using System;
using System.Collections.Generic;
using System.Linq;
using System.Threading.Tasks;
namespace StudentsAcademy.Models
{
    public class StudentsModel
    {
        public string CustomerNo { get; set; }
        public string FullName { get; set; }
        public DateTime Birthday { get; set; }
        public int Gender { get; set; }
        public int Nationality { get; set; }
        public string Address { get; set; }
        public string UserName { get; set; }
        public string Password { get; set; }
        public string Email { get; set; }
        public string Mobile { get; set; }
        public string Note { get; set; }
    }
}
using Microsoft.AspNetCore.Mvc;
using StudentsAcademy.Models;
using System;
using System.Collections.Generic;
using System.Linq;
using System.Threading.Tasks;
namespace StudentsAcademy.Controllers
{
public class StudentsController : Controller
{
public IActionResult Index()
{
return View();
}
public IActionResult NewStudent()
{
return View();
}
public IActionResult ReceivedDataByRequest()
{
string CustomerNo = Request.Form["CustomerNo"];
string FullName = Request.Form["FullName"];
string Birthday = Request.Form["Birthday"];
return View("ReceivedDataByRequest", $"Customer Number :{CustomerNo} ,FullName is {FullName} ,Birthday is {Birthday}");
}
public IActionResult ReceivedDataByParameter(string CustomerNo,string FullName, string Birthday)
{
return View("ReceivedDataByRequest", $"Customer Number :{CustomerNo} ,FullName is {FullName} ,Birthday is {Birthday}");
}
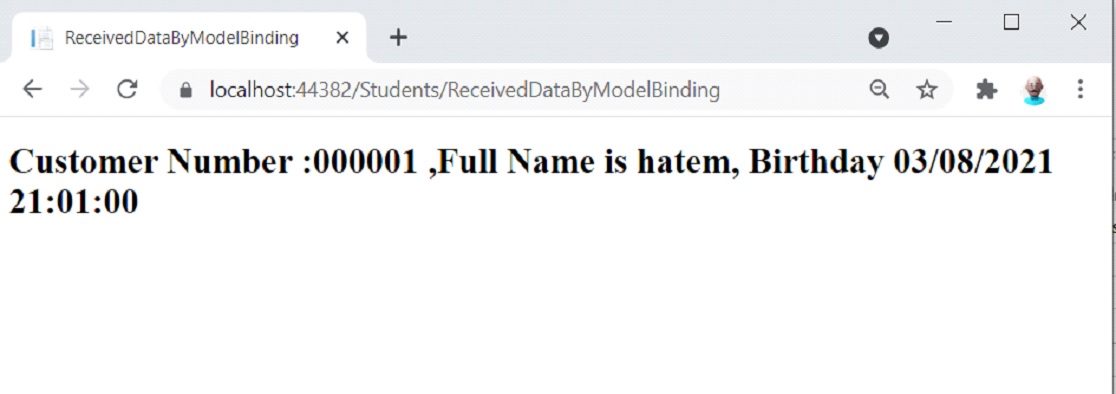
public IActionResult ReceivedDataByModelBinding(StudentsModel Student)
{
return View("ReceivedDataByModelBinding", Student);
}
}
}
@using StudentsAcademy
@using StudentsAcademy.Models
@addTagHelper *, Microsoft.AspNetCore.Mvc.TagHelpers
@model StudentsModel
@{
    ViewData["Title"] = "ReceivedDataByModelBinding";
    Layout = null;
}
<!DOCTYPE html>
<html>
<head>
    <meta name="viewport" content="width=device-width" />
    <title>ReceivedDataByModelBinding</title>
</head>
<body>
    <h1>Customer Number :@Model.CustomerNo ,Full Name is @Model.FullName, Birthday @Model.Birthday</h1>
</body>
</html>
model StudentsModel
@{
    Layout = null;
}
<!DOCTYPE html>
<html>
<head>
    <meta name="viewport" content="width=device-width" />
    <title>Index</title>
    <link href="~/lib/bootstrap/dist/css/bootstrap.css" rel="stylesheet" />
</head>
<body>
    <div class="container">
        <form method="post" asp-action="ReceivedDataByModelBinding">
            <div class="form-group">
                <label>CustomerNo:</label>
                <input class="form-control" asp-for="CustomerNo" />
            </div>
            <div class="form-group">
                <label>FullName:</label>
                <input class="form-control" asp-for="FullName" />
            </div>
            <div class="form-group">
                <label>Birthday:</label>
                <input class="form-control" asp-for="Birthday" />
            </div>
            <div class="form-group">
                <label>Gender:</label>
                <select class="form-control" asp-for="Gender">
                    <option value="M">Male</option>
                    <option value="F">Female</option>
                </select>
            </div>
            <div class="form-group">
                <label>Nationality:</label>
                <select class="form-control" asp-for="Nationality">
                    <option value="M">Jordan</option>
                    <option value="F">Saudi Aribae</option>
                    <option value="F">UAE</option>
                </select>
            </div>
            <div class="form-group">
                <label>Address:</label>
                <input class="form-control" asp-for="Address" />
            </div>
            <div class="form-group">
                <label>UserName:</label>
                <input class="form-control" asp-for="UserName" />
            </div>
            <div class="form-group">
                <label>Password:</label>
                <input class="form-control" asp-for="Password" />
            </div>
            <div class="form-group">
                <label>Email:</label>
                <input class="form-control" asp-for="Email" />
            </div>
            <div class="form-group">
                <label>Mobile:</label>
                <input class="form-control" asp-for="Mobile" />
            </div>
            <div class="form-group">
                <label>Note:</label>
                <input class="form-control" asp-for="Note" />
            </div>

            <button class="btn btn-primary" type="submit">Submit</button>
        </form>
    </div>
</body>
</html>
asp-for="CustomerNo"
@model StudentsModel
https://localhost:44382/students/NewStudent


اترك تعليقك